


How to transfer emails between two Gmail accounts
Recently, a friend of mine created a new Gmail account that included her full name instead of a generic screen name she had been using for the last several months. She called me up and ask me how she could move emails from one Gmail account to another. After fiddling around with it a bit, I figured it out and it’s not very hard. Of course, it would be cool if Gmail just had a button called Import that let you connect to your old Gmail account and import all the emails, but it’s not that simple. In order to move emails from one Gmail account to another, you have to follow the steps below: Step 1: First, log into the old email account (current one you are using) and click on Settings, then Forwarding and POP and choose Enable POP for all mail. Make sure to click Save Changes at the bottom. Step 2: Now log into the new email account and click on Settings again. Then click on Accounts and click the Add a mail account you own link. Step 3: Now type in the old Gmail email address into the text box and click Next. Step 4: Now type in the password for the old email account and choose pop.gmail.com from the POP Server drop down list. Click Add Account. Step 5: Next you’ll be asked if you want to be able to send email as oldaddress@gmail.com. This is useful if you want the mail to come into the new account, but be able to respond using the old email address. Step 6: Type in your name for the old email address and choose whether you want the reply address to be the old address or you can optionally change it to the new one, which is a good idea so that people will eventually stop writing to the old address. Step 7: Finally, you will have to verify that you actually own the old email address by clicking the Send Verification button. You can then log into your old email account and copy the confirmation code in the email. Paste that into the appropriate box. Click Verify. Step 8: Now just sit back and watch all your emails get imported into the new Gmail account. If you have a lot of emails, it could take several hours, so be patient! So that’s all the steps required to transfer emails from one Gmail account to another. If you have any questions, post a comment! Enjoy!


note: this article from : http://www.online-tech-tips.com
How to convert a PDF file to Word, Excel or JPG format
How to convert a PDF file to Word, Excel or JPG format
Update: There’s a much easier way to convert a PDF to JPG image format than the method I have mentioned below. Here’s how you can do it using Zamzar.com.
Convert a PDF file to JPG - Easy Way
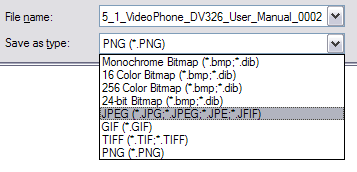
Go to ZamZar.com, browse for your file and choose PNG format for the format to conver to under Step 2. PNG is another newer picture format that is slowly replacing the JPG format. Most programs that can open JPG files can open PNG. Zamzar automatically converts each page in the PDF document into it’s own PNG picture file. Now you can simply open Microsoft Paint (yes, all you need it Paint!) and choose File - Save As from the menu and choose JPEG from the drop down list of formats.
Convert PDF to JPG Format - Second Way
The first thing you’ll need to do is download a free software (the only one I could find) that converts PDF documents to JPEG image format automatically. Go to the Omniformat download page and download both Omniformat v8.3 and the PDF995 app. You will need to download and install PDF995 first before installing Omniformat. Once you have both programs installed, go to your Start Menu programs, find the program group Software995 and click on Omniformat.

The only annoying thing about this program is that it requires you to view some ads for about 30 seconds! However, it’s better than paying $20 or $40 for a program just to do a simple conversion! It does pop up another instance of your browser window for the web site of each of the sponsors, but it does not install any spyware onto your computer (no popup ads). Once the program is loaded, you’ll see it has a section called “Watch Folders” and then a button at the bottom titled “Start Monitoring” and “Single Pass“.

Basically the way it works is that you need to COPY the PDF files you want to convert to JPG format to the C:\omniformat\watch folder and then press Single Pass. The program will look in that directory and convert each page of each PDF into a separate JPG file. If you click Start Monitoring, you can keep dropping PDFs into that folder and the program will automatically convert them into JPGs as long as the program is open. Note that the program DELETES the original PDF document that it uses, so that’s why you need to COPY the PDF document to the watch folder, not move it! You should now see your converted files like below:

Convert your PDF to a Word document
Go to Zamzar.com and click the Browse button next to Step 1 and choose your file. By default, Step 2 will be set to DOC format, but you can choose to convert your PDF to other file types such as TXT, HMTL, RTF, etc. Type in your email address for Step 3 and click Convert.
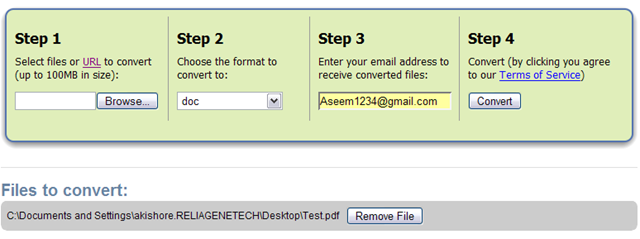
You should receive an email within a few minutes with a download link to your converted file. I have tried out this service on some pretty complex PDF documents with text in multiple columns, multiple images, etc and have been very impressed with it’s conversion accuracy.
Convert a PDF file to Excel format
We will again follow the steps above using Zamzar, but this time choose TXT as the format you want to convert to. Unfortunately, you can’t convert straight to Excel format, so we’ll have to go through the intermediary TXT format. Once you have downloaded the TXT file and saved it on your computer, open Microsoft Excel and go to File - Open and change the Files of Type combo box to All Files.
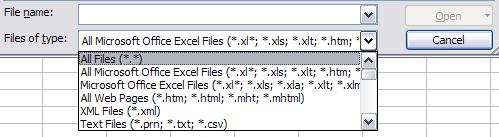
Now you should see the converted text file in the list of files. Choose it and click Open. You’ll now be brought to the Text Import Wizard. You have to open the file in this manner because if you simply right-click and say Open With Excel, all of the text for each row will appear in the first column and not be separated.
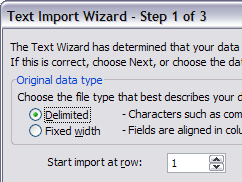
For Step 1, choose Delimited from the two options listed.
Click Next and check off the Space checkbox as one of the delimiters. Each value should now be separated by a vertical line, indicating it’s going to be in a separate column.

Click Next and then click Finish. You can now save the file as an Excel file by going to File - Save As. There are a few drawbacks, however, as this conversion does not always work perfectly! For example, if the original Excel sheet had a column where there was text with spaces included, each word will be separated into it’s own column! Also, you won’t see any formulas or functions that may have been in the original Excel sheet, only the text.
It’s as easy as that! You can use many other image editing programs also such as Photoshop, Corel, etc, etc, but I chose Paint because that is universally available on just about every Windows computer.
note: this article from : http://www.online-tech-tips.com
How to configure Gmail on Microsoft Outlook
The following steps will explain about configuring gmail on Microsoft Outlook. First you have to enable POP for gmail Email ID.
Enabling POP
You can retrieve your Gmail messages with a client or device that supports POP, like Microsoft Outlook or Netscape Mail.
To enable POP in Gmail:
1. Sign in to Gmail.
2. Click Settings at the top of any Gmail page.
3. Click Forwarding and POP/IMAP.
4. Select Enable POP for all mail or Enable POP for mail that arrives from now on.
5. Choose the action you’d like your Gmail messages to take after they are accessed with POP.
6. Configure your POP client* and click Save Changes.
Follow the instructions below to set up POP access in Outlook 2007
To configure Outlook 2007 for your Gmail address:
1. Enable pop , Don’t forget to click Save Changes when you’re done.
2. Open Outlook.
3. Click the Tools menu, and select Account Settings…
4. On the E-mail tab, click New…
5. If you are prompted to Choose E-mail Service, select Microsoft Exchange, POP3, IMAP, or HTTP, and click Next.
6. Fill in all necessary fields to include the following information:Your Name: Enter your name as you would like it to appear in the From: field of outgoing messages.
Email Address: Enter your full Gmail email address (username@gmail.com). Google Apps users, enter your full address in the format username@your_domain.com.
Password: Enter your email password.
Manually configure server settings or additional server types: Leave this option unchecked if you want to automatically configure Outlook 2007. If you want to manually configure Outlook 2007, check this box now. Google Apps users should configure manually as follows.
7. Click Next. If you are configuring Outlook 2007 automatically, you’re done! Just click Finish.
8. If you are configuring Outlook 2007 manually, select Internet E-mail and click Next.
9. Verify your User Information, and enter the following additional information:Server Information
Account Type: POP3
Incoming mail server: pop.gmail.com (Google Apps users, enter the server names provided, don’t add your domain name in these steps)
Outgoing mail server (SMTP): smtp.gmail.com
Logon Information
User Name: Enter your Gmail username (including @gmail.com). Google Apps users, enter your full address in the format username@your_domain.com
Password: Enter your email password.
Require logon using Secure Password Authentication (SPA): Leave this option unchecked.
10. Click the More Settings… button, and select the Outgoing Server tab.
11. Check the box next to My outgoing server (SMTP) requires authentication and select Use same settings as my incoming mail server.
12. Click the Advanced tab, and check the box next to This server requires an encrypted connection (SSL) under Incoming Server (POP3).
13. In the Outgoing server (SMTP) box, enter 587, and select TLS from the drop-down menu next to Use the following type of encrypted connection:
14. Click OK.
15. Click Test Account Settings… After receiving ‘Congratulations! All tests completed successfully’, click Close.
16. Click Next, and then click Finish.
Fix Common Computer Network Issues
Are you experiencing problems with your computer network? Are these error messages appearing?:
* Unable to clear the DNS cache
* Unable to renew your IP address
* An operation was performed on something that is not a socket
* Unable to clear the ARP cache
If so, here are some potential solutions for Windows XP/Vista.
1. Check to make sure your computer is on and is connected to a network.
2. Be aware that Windows has a built in function to repair a network connection. This function can give valuable information in the form of an error message if you know what you are looking for. Some common error messages given are:
* Unable to clear the DNS cache
* Unable to renew your IP address
* Unable to clear the ARP cache
3. Deal with a message that states “Unable to clear the DNS cache.” When you get the message “Unable to clear the DNS cache”, this usually means that the DNS client service has been disabled. Follow these steps as an administrator to re-enable it:
* Open the Services MMC plugin, located under Administrative Tools in the Control Panel;
* Find the “DNS Client” service in the list presented and enter it’s properties by double-clicking it;
* Change the Startup Type from Disabled to Manual or Automatic then click apply;
* Either reboot or click “Start” to start the service;
* Verify by attempting to repair the connection again.
4. Fix a problem related to an IP address. If the repair process reports that it has been ‘Unable to obtain an IP address’, it is probable that more information can be obtained through the command line. Open a Command Prompt by going to Start > Programs > Accessories > Command Prompt, then type ‘ipconfig /renew’ to attempt to obtain an IP address from the command line.
5. Follow up the error messages that will likely appear. There is a high likelihood of an error message similar to the one below occurring, the remainder of the guide will focus on this error.
* “An operation was performed on something that is not a socket”
6. Fix the error message “An operation was performed on something that is not a socket.”: This is a Winsock corruption generally due to spyware. The fixes are:
* A simple fix can be done with Windows XP SP2 or Windows Vista (Start > Run > cmd > netsh winsock reset), then reboot your computer. If you do not have SP2, you can download a small program to reinstall Winsock: winsockfix.exe.
Install Windows XP On Windows Vista Without Formatting Hard Drive
In this post we are going to share with you the experience we had while trying to Install Windows XP on new laptop which has Windows Vista and how we achieved it virtually.
I bought a HP Pavallion notebook which had Windows Vista, and first thing I wanted was to make it dual boot with Windows Vista and Windows XP. I studied a lot of articles on Internet for installing Windows XP on new laptop. So I did a spilt-streaming of SATA drivers and Windows XP onto a same CD using nLite tool. The CD was able to start the setup, but as soon as the system restarted between, all was gone, it neither booted again with XP setup nor it had Vista on boot-loader anymore.
Finally I was back to face this reality that these new pieces of hardware are not happy to run Windows XP because of driver issues and other compatibility problems. I was disappointed with this for a week or so, after which I realized that we can do a Virtual Install with a tool from Microsoft. This tool is called Virtual PC, so I will tell you how I Installed Windows XP on Windows Vista without any trouble.
Fix:
The good part about Virtual PC is that its a Virtual Environment within your running Windows Vista operating system, this means that you need not create a separate partition for it, you need not worry about boot-loader and other problems, and it is very convenient to Install and problem free.
For this, you need to download and install Virtul PC on your computer. Download Virtual PC here.
After you download and install Virtual PC from Microsoft, run the virual PC, on this you can now create a virtual Window XP machine. We will give you detailed steps one by one as below:
- Run the Virtual PC and click on New Button
- This will launch a new virtual machine wizard like one below
- Now Give it a name, any name u like, I gave it Windows XP machine
- Select Windows XP on this screen from the list of OS
- Now select the memory or RAM which you want windows XP to use, if you have more than 2GB RAM on your computer, select about 500 MB for this virtual machine. This is the amount of RAM out of your total RAM which will be used for running Windows XP in virtual Environment.
- Now Select to create a new Virtual hard disk. Good thing is that, this will be created inside a file, and that file will be of only that much space, as is in use, not the free space part.
- Now select the path or the virtual hard disk and size, we recommend minimum of 5000 MB, you can give any size, 100000MB would be good and enough for most cases.
- This Completes half-job! Virtual Environment is created, now you can install Windows XP on it, how? Well, not difficult, just read on.
- After you create this machine, you will see the machine name in the list, click on machine name, and click start. this will launch the virtual environment.
- Now you will need a Windows XP CD or ISO and a valid Windows XP Serial Number. In this window, click on CD and select the CD path. After this step, just press enter on this screen, and see the magic ! Windows XP installation will start on this virtual machine.
- Windows XP setup launches
NOTE: To make full use of XP and make it run smooth, you must install Virtual Update Install Additions, steps available here.
